Saturday, September 29, 2012

Thumbprint Jam Cookies

Hey everybody, sorry it's been a while.  Things have been busy at work and when I come home my husband has usually made dinner or is about to start dinner.  However, this past Wednesday I had off and since my husband, Tom, surprised me last week by giving me a new cook book I wanted to try baking one of the recipes.  The new cook book is called The Joy of Gluten-Free, Sugar Free Baking by Peter Reinhart & Denene Wallace.  Since I love to bake, I'm always looking for new recipes and new ways of baking.  This book doesn't use regular Gluten-Free Flour, but other alternative flours, like Pecan Flour, Coconut Flour, and Almond Flour.  So if you are allergic to nuts this book is not for you.  They also replace sugar with either Splenda (which I wouldn't recommend using since it's not natural) or Stevia (which is natural).  You can use Stevia Extract in the Raw or New Roots Stevia Sugar, or Splenda.  Splenda is a lot easier to find, it's at your local grocery store.  However, finding Stevia was a little more difficult.  I could have bought many many many boxes of it in those tiny small packages, but I wanted a large bag.  The only place I found it was at Walmart.  As for the New Roots Stevia, I think it's more expensive and I don't know where you can buy it, Amazon.com maybe? 

The first recipe I decided to try were these Thumbprint Jam Cookies, they were easy and came out delicious.

What you'll need:

2 1/2 cups (10 oz.) almond flour (I always weigh out my flour because I've noticed the end result is always better.)
1 cup (4 oz.) coconut flour
1 1/2 cups Splenda or Stevia Extract in the Raw, or 3/4 cup New Roots Stevia Sugar
1 1/2 teaspoons baking powder
1/2 teaspoon salt
3 eggs
1/2 salted butter or margarine, melted
4 teaspoons vanilla extract
About 6 tablespoons sugar-free jelly or jam (I didn't use sugar-free, I just used what I had lying around in the refridgerator.)

Position 2 oven racks in the middle of the oven.  Preheat the oven to 350 degrees.  Lightly mist 2 baking sheets with spray oil, or line them with parchment paper or silicone mats and then lightly mist the surfaces with spray oil.

In medium bowl, combine the almond flour, coconut flour, sweetener, baking powder, and salt and whisk until well mixed.


In a large bowl, whisk the eggs, butter, and vanilla together.


Add the flour mixture and stir with a large spoon for 1 to 2 minutes to make a stiff, playdough-like dough.  The spoon should be able to stand straight up with out falling.


To form each cookie, scoop out 1 heaping tablespoon of dough and, using oiled hands (I put jojoba oil on mine), roll it into a ball, then press it gently between your palms to flatten it slightly.  Place the cookies on the prepared pans, spacing them 3 inches apart.  Press your thumb into the center of each cookie to make an indentation.  Spoon 1/2 teaspoon of the jelly into each indentation.

Bake for 8 minutes, then rotate the pans.


Switch racks and bake for 8 to 10 minutes, until golden and firm to the touch.

Immediately transfer the cookies to a wire rack and let cool for at least 15 minutes before serving to allow the jam to cool.


Enjoy! 

Sunday, September 16, 2012

Penzeys Chicken and Broccoli with Raspberry Enlightenment


 Hey all!  Hope everybody's weekend is going well, and I'd like to wish all my Jewish readers (whoever that might be) a Happy New Year.  In case you didn't know, to those who don't practice Judaism, Rosh Hashanah begins at sundown tonight. 

When I received this month's Penzeys catalog, it was dedicated to their Raspberry Enlightenment, which isn't a spice, it's a jam.  There were many recipes featuring this jam as an ingredient in a wide variety of food.  A lot of them were dinner/lunch recipes that featured it.  I would never have thought you could put a raspberry jam on a cheeseburger, chicken or green veggies like asparagus and broccoli.  When I made the chicken and broccoli recipe on Thursday evening, I was pleased by the outcome, and so was my husband.

I also just want to say "sorry" for the blurry pictures, I usually take pictures from my iPad using Evernote.  Since the lighting in my kitchen is bad when the sun goes down, this is the best my iPad can do.  I'll try to used a camera when it's darker out next time.


What you'll need for the Chicken with Raspberry Enlightenment:

2 boneless/skinless chicken breasts
1/2 tsp. Ground Pepper (I used Penzeys, and it did make a difference in taste as compared to my table pepper.)
1/4 tsp. Granulated Garlic Powder (Again I used Penzeys, I'm not sure if there was that much of a difference though.)
1/4 tsp. Powdered Ginger (I used the one that came with my spice rack.)
1/4 tsp. Thyme (From my spice rack.)
1/4 tsp. Kosher-Style Flake Salt (I just used regular sea salt, which is flaky.)
1 TB. Olive Oil
1 TB. Raspberry Enlightenment
1 tsp. Soy Sauce

What you'll need for the Broccoli with Raspberry Enlightenment:

3 Cups cut broccoli
2 tsp. Olive Oil
1 tsp. Raspberry Enlightenment
1/2 tsp. Mural of Flavor (One of my favorite Penzeys Spices.)


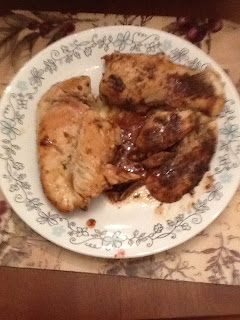
First, rinse the chicken and pat dry.  Season with pepper, garlic, ginger, thyme, and salt.  Heat the olive oil over medium-high heat in a large heavy pan.  Cook the chicken breasts for 10-12 minutes, depending on how thick the breasts are, turning every few minutes so the chicken is browned on both sides.


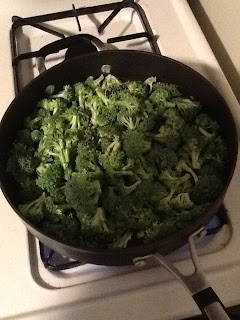
While the chicken is cooking, cook the broccoli in a pan with 1/2-inch of boiling water until done, 3 minutes or so, depending on how soft you like it.  It will continue to soften a bit after cooking.


  Drain the broccoli very well.  Return the pot to the stove over medium heat and add the olive oil.  When hot, add the broccoli and then drizzle with Raspberry Enlightenment.  Sprinkle with Mural of Flavor, toss and serve.


Just before removing the chicken from the pan, take the pan off the heat and drizzle the chicken with Raspberry Enlightenment and of soy sauce, turning to coat both sides.  Serve with broccoli.

I realize that the chicken doesn't look evenly coated but I kept turning all the pieces over to get an even coat.

You can serve this dish over rice as well.  Enjoy! 


Friday, September 14, 2012

Braised Chicken with Asparagus and White Wine


Hey everybody, sorry it's been a few days but it's been a busy week at work.  The week before After School starts is always the busiest I've been told, and it definitely was.  I made this recipe on Monday or Tuesday, I can't remember it's been a long week, from my cookbook Robin Takes 5.  One thing to remember always cut the hard stalks off of your asparagus!  I must have been tired that day because I completely forgot, after all it's not the first time I've worked with asparagus.

This is also the very first blog with poultry.  I don't usually like to handle raw chicken so I try not to make it too often.  However, making chicken is very easy and quick, and with the right seasoning, tastes great.  So enjoy!

What you'll need:

1 tablespoon olive oil
1 1/4 pounds boneless, skinless chicken breasts
1 tablespoon lemon and herb seasoning ( I used Penzeys Spices' Mural of Flavor)
1/2 cup dry white wine or vermouth
1 cup reduced-sodium chicken broth
1 bunch asparagus, stem ends trimmed and spears cut into 2-inch pieces (I didn't cut them into pieces...oops.)

Heat the oil in a large skillet over medium-high heat.  Add the chicken and cook for 2 to 3 minutes, until golden brown on all sides, stirring frequently.  Add the seasoning and cook for 1 minute, until the seasoning is fragrant.  Add the wine and cook for 1 minute.


Add the broth and asparagus and bring to a simmer.  Simmer for 3 to 5 minutes, until the chicken is cooked through and the asparagus is crisp-tender.


Season to taste with salt and freshly ground black pepper before serving.

Note:  Depending on how thick your chicken breasts are, it might take longer to cook than state above. 

Saturday, September 8, 2012

Grow-a-Row Day Camp Trip

I don't know if I ever mentioned what I do for a living, but I work at an after school program, and in the summers it's a six hour day camp.  I work in the inner city of Paterson, New Jersey.  The kids don't come from wealthy backgrounds and probably witness things no child should witness at any age in their neighborhoods.  During the day camp, we were provided food from New Jersey's Food Bank to serve the kids breakfast and lunch Monday-Friday.  The Food Bank offered a trip to a farm, called a "Grow-a-Row" farm.  Here's a link to learn more about what Grow-a-Row is.  The farm we went to was in Pittstown, New Jersey called Peaceful Valley Orchards.  This farm was very big, and we were there to have the kids pick their own corn and green beans.  The kids loved picking their own vegetables, some were very excited and ended up with bags too heavy for them to carry.  Hey, we warned them, "you pick it, you're carrying it." 

I brought home six ears of corn, which was very sweet corn, and many green beans.  Since I had brought some extra money, I thought I'd buy some things the farm was selling.  I bought some plums, two jars of jam, and a small cider drink.  The plums were very tiny, maybe a little bit bigger than the pits they encase.  They were also extremely juicy.  If I lived close to that farm, I know where I'd be getting my produce. 


I also mentioned I bought some jars of jam, and a bottle of cider.  The cider was peach cider, and I wished I bought more bottles, but that one bottle I bought was expensive. 


The jars of jam were worth every penny.  I have been using them on graham crackers, for peanut butter and jelly sandwiches, as well as a morning English muffin or raisin cinnamon muffin.  I must  find this company and find out where they sell their products, since I don't live close to Pittstown. 


I never had a chance find a good corn recipe, so I just brought the ears over to my parents' to have for a Sunday dinner.  I did get to make a yummy vegetable medley with the green beans though. 


I cut up some zucchinis, red and yellow peppers, as well as the green beans and tossed them in some olive oil and garlic.  I think I served it as a side.  On the side of what, I can't remember.  This goes back to mid-July. 

Wednesday, September 5, 2012

Spaghetti with Fresh Veggies

Ok, this recipe didn't come as one of the step-by-step recipes I usually blog about.  This recipe did come from a cookbook, but it wasn't listed as one of the big recipes in the book.  It came from Chapter Three under, "Perfect your pasta," in The New Abs Diet Cookbook.  The guy that wrote this book wrote the Eat This Not That! books, as well as my favorites, Cook This Not That!  And yes, he also wrote The Abs Diet books.  I started to read one of the books for women on my iPad.  It made a lot of sense and it sounded like a lot of things my trainer has been telling me all along. 

So, here is how to "perfect your pasta:" 

1.  Heat 2 tablespoons of extra-virgin olive oil in a large skillet over medium-high heat.  Add 2 garlic cloves, sliced thin, and toast lightly.  Next add vegetables chopped into bite-size pieces.  I used asparagus, broccoli, and mushrooms.  You can also use artichokes, zucchini, parsnips, Swiss chard, and cauliflower as the book lists.  Cook for 10 minutes until caramelized.  Season with salt and pepper.  I also used Penzeys' Pasta Sprinkle.


2.  Bring a pot of salted water to a boil.  Add 8 ounces of dried spaghetti (just use your the space between your thumb and pointer finger to measure and that should be enough) and cook for 1 minute less than the shortest time listed on the package.

3.  Drain the pasta, reserving a cup of the cooking water.  Toss the pasta in the pan with the vegetables and cook for 30 seconds.


If the pasta is dry, add a bit of the cooking water.  Toss in chopped fresh parsley, basil, and oregano (or used dried, it works fine too) and serve with grated Parmigiano-Reggiano cheese (or with what you like). 


 The dinner turned out very yummy and I was happy knowing it was healthy.  :-)